
Oh, let me tell you about one of my favorite bread recipes—No Knead Rye Bread. There’s just something magical about baking bread from scratch, especially when it’s so easy and doesn’t require hours of kneading. This rye bread has a hearty texture, a deep, earthy flavor, and a beautiful crust that comes out perfectly every time. I remember the first time I made it—it was a cold winter day, and I decided to surprise my family with freshly baked bread. The smell that filled the house as it baked was enough to make everyone’s mouths water before the bread even came out of the oven. Now, every time I make this bread, it reminds me of those cozy family moments.
What I love most about this No Knead Rye Bread is how simple it is to make. No kneading, no complicated steps, just a few ingredients and patience. Plus, the fact that it’s so versatile makes it even better. You can pair it with your favorite soups, slather it with butter, or use it to make an incredible sandwich. It’s one of those recipes that makes you feel like you’ve mastered something complicated, but in reality, it’s just a few ingredients and a bit of waiting.
So, what makes this No Knead Rye Bread different from other breads? First, the rye flour gives it a distinct, hearty flavor. The addition of caraway seeds brings an aromatic depth to the bread that complements its rustic texture. And because it’s no knead, you can make it with very little effort—just a few stirrings and then some time to let the dough rise and develop all those wonderful flavors. This bread is proof that sometimes, the simplest recipes are the best ones.
Let’s dive into the ingredients for this delicious No Knead Rye Bread and see what makes it so special.
What’s in No Knead Rye Bread?
Rye Flour: Rye flour is the star of the show. It gives this bread its characteristic dark color and earthy, slightly tangy flavor. Rye flour also creates a denser loaf, which makes it perfect for hearty sandwiches.
All-Purpose Flour: A little bit of all-purpose flour is added to balance the texture and make the bread rise just right. This combination of flours gives the bread a slightly chewy yet tender crumb.
Caraway Seeds: These little seeds are the perfect complement to rye bread. They add a mild, nutty flavor and a hint of spice that takes the bread to the next level. If you’re not a fan of caraway, you can skip them, but I highly recommend them!
Salt: Essential for flavor, salt enhances the taste of the rye and brings out the natural richness of the bread.
Instant Yeast: Instant yeast makes the bread rise quickly and easily without needing any kneading or special steps. It’s the secret ingredient that makes this No Knead Rye Bread so effortless.
Water: Water is the binding element that brings everything together and helps the dough rise. Be sure to use warm water—not too hot, just a nice lukewarm temperature.
Honey: Just a touch of honey adds a subtle sweetness to balance the tanginess of the rye. It also helps with browning the crust.
Now that you know what goes into this No Knead Rye Bread, let’s get to the fun part—baking it!
Ingredients
-
2 cups rye flour
-
1 ½ cups all-purpose flour
-
1 ½ teaspoons salt
-
1 teaspoon instant yeast
-
1 tablespoon caraway seeds (optional but recommended)
-
1 tablespoon honey
-
1 ½ cups warm water
How to Make No Knead Rye Bread
-
Start by grabbing a large mixing bowl. In it, combine the rye flour, all-purpose flour, salt, yeast, and caraway seeds. Give everything a good stir to make sure it’s well blended. I like using a wooden spoon for this—it makes me feel more connected to the process.
-
Next, add the honey to the warm water. Stir it gently until the honey dissolves. Slowly pour this honey-water mixture into the dry ingredients while stirring. Keep mixing just until everything comes together into a sticky dough. Don’t worry if it looks rough—that’s exactly what you want.
-
Now cover the bowl with plastic wrap or a clean kitchen towel. Let it sit at room temperature for about 12 to 18 hours. I usually prepare the dough in the evening and bake the bread the next morning. The long rest gives the dough time to develop incredible flavor and those lovely bubbles that give the bread its chewy texture.
-
Once the dough has risen and is full of air bubbles, dust your countertop with flour. Gently scrape the dough out of the bowl onto the floured surface. Use floured hands to shape it into a rough ball. Don’t knead it—just fold it over a couple of times to form a round shape.
-
Line a bowl or proofing basket with a clean kitchen towel and dust it generously with flour. Place the dough seam-side down into the towel-lined bowl. Cover and let it rise again for about 1 to 2 hours, until puffy.
-
While the dough is rising, place a Dutch oven (or heavy oven-safe pot with a lid) into your oven and preheat it to 450°F (230°C). This step is important for achieving that beautifully crisp crust.
-
When you’re ready to bake, carefully remove the hot pot from the oven. Turn the dough out onto a piece of parchment paper so the seam is now on top, then lift the parchment and dough into the hot pot.
-
Cover with the lid and bake for 30 minutes. Then, remove the lid and bake for another 10 to 15 minutes, until the crust is deep golden brown.
-
Remove the bread from the pot and place it on a wire rack to cool. The hardest part? Waiting! But it’s worth it—let it cool completely before slicing to let the crumb set perfectly.
Pro Tips and Delicious Twists
– If you want a more sour taste, reduce the honey or skip it and let the dough ferment for a full 18 hours.
– Don’t have a Dutch oven? You can use any oven-safe pot with a lid, or place a tray of water in the oven to help steam the crust.
– Feel like adding more texture? Toss in sunflower seeds or chopped walnuts during the first mix for added crunch.
– Want a more robust rye flavor? Try using dark rye flour instead of medium rye. It’s more intense and gives a deeper color.
This bread is perfect with just a swipe of butter or as the foundation for a hearty sandwich. Once you try it, you’ll see why I keep coming back to this recipe week after week.
How to Make No Knead Rye Bread (In-Depth Guide)
Making this no knead rye bread is incredibly rewarding. Even though the process takes time, the effort is minimal—and the results speak for themselves. Let me walk you through each step with a bit more detail, just like I do in my own kitchen.
Step 1: Mix the Dry Ingredients
In a large mixing bowl, combine:
-
2 cups rye flour
-
1 ½ cups all-purpose flour
-
1 ½ teaspoons salt
-
1 teaspoon instant yeast
-
1 tablespoon caraway seeds (optional but so flavorful)
Stir everything together. I like to use a large wooden spoon to combine the dry ingredients well. You want the yeast, salt, and flour to be evenly distributed so the bread rises properly and has consistent taste throughout.
Step 2: Add Honey Water
In a separate small bowl or measuring cup, stir together:
-
1 ½ cups warm water
-
1 tablespoon honey
Mix until the honey is fully dissolved in the water. This gives your dough a touch of sweetness and balances the earthiness of the rye.
Slowly pour the honey water into the dry ingredients while stirring with a spoon. You’ll end up with a sticky, shaggy dough. That’s okay—don’t try to knead it! The no-knead method relies on time to do the hard work.
Step 3: Let the Dough Rest Overnight
Cover the bowl tightly with plastic wrap or a clean kitchen towel. Leave it on your counter at room temperature for 12 to 18 hours. I usually do this step before bed, so the dough is ready to shape and bake in the morning.
By morning, the dough will have risen beautifully. It should look bubbly and soft. This long fermentation improves both the flavor and texture—without needing any kneading.
Step 4: Shape the Dough
Lightly flour your countertop and gently turn the dough out of the bowl onto the surface. Don’t punch it down—you want to keep those air bubbles. Use your hands to gently fold the dough over itself a couple of times. Shape it into a loose ball.
Prepare a bowl or proofing basket by lining it with a clean towel and dusting it generously with flour. Place the dough seam-side down into the lined bowl. Cover it again with the towel and let it rise for another 1 to 2 hours. It should look puffier and hold its shape better.
Step 5: Preheat the Oven and Dutch Oven
About 30 minutes before you’re ready to bake, place a Dutch oven (or another heavy oven-safe pot with a lid) into your oven. Preheat to 450°F (230°C). This step is key—it gives the bread a big burst of heat for a gorgeous crust.
Step 6: Transfer Dough and Bake
Cut a piece of parchment paper large enough to hold the dough. Gently flip the dough out of the towel-lined bowl onto the parchment, so the seam side is now facing up. Carefully lift the parchment and dough and place it into the hot Dutch oven.
Cover with the lid and bake for 30 minutes. Then remove the lid and continue baking for another 10 to 15 minutes. You’ll know it’s done when the crust is a deep golden brown and the bread sounds hollow when tapped.
Step 7: Cool and Serve
Remove the bread from the pot and place it on a wire rack to cool completely. This might be the hardest part—waiting to cut into it! But trust me, slicing it too early can make the crumb gummy.
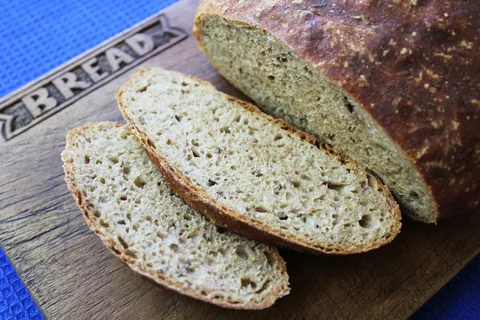
Once it’s cool, slice and serve. This bread is amazing with just butter, alongside soups, or as sandwich bread. The crust is chewy, the inside is soft with just a hint of rye tang, and the aroma? Irresistible.
Fun Ideas and Additions
– Add a handful of chopped walnuts or sunflower seeds for texture.
– Want more rye intensity? Use dark rye flour instead of medium rye.
– Swap honey for molasses for a deeper, richer flavor.
– Toast the slices and top with avocado or egg salad for a wholesome breakfast.
This bread has become a staple in my kitchen because it delivers artisan-quality results without any complicated steps. I hope it becomes one of your favorites too!
Frequently Asked Questions
1. Can I use only rye flour instead of mixing with all-purpose flour?
Rye flour is low in gluten, so using it on its own can lead to a very dense loaf that doesn’t rise well. I recommend combining rye flour with all-purpose flour to achieve a nice balance of texture and structure. However, if you prefer a denser, more traditional loaf, you can experiment with a higher ratio of rye to white flour—just be prepared for a more compact result.
2. Do I really need a Dutch oven to bake this bread?
A Dutch oven is ideal because it traps steam, helping the bread develop a crispy, golden crust. But if you don’t have one, don’t worry. You can bake your bread on a baking sheet or in a loaf pan. Place a metal tray filled with hot water on the bottom rack of your oven to mimic the steam environment. It won’t be exactly the same, but it still works beautifully.
3. Can I add seeds or nuts to this no knead rye bread?
Absolutely! I often toss in sunflower seeds, flaxseeds, or chopped walnuts. You can stir them into the dough during the initial mix, or roll the dough in them before the final rise for a crunchy crust. Just don’t overload the dough—1/3 to 1/2 cup of additions is a good amount.
4. How long does this bread stay fresh, and can I freeze it?
This bread stays fresh for about 2 to 3 days if stored in a paper bag or wrapped in a clean kitchen towel. Avoid plastic bags as they soften the crust. To freeze, let the bread cool completely, then wrap it tightly in foil or plastic wrap and store it in a freezer bag. It will stay good for up to 2 months. To enjoy, thaw at room temperature or toast slices straight from frozen.
No Knead Rye Bread
- Total Time: 55 minutes
- Yield: 1 loaf (about 10–12 slices) 1x
Description
This No Knead Rye Bread is a rustic, hearty loaf with a crisp crust and tender crumb. Perfect for beginners, it requires no kneading and minimal hands-on time. With the earthy depth of rye flour and the simplicity of a slow-rise method, it’s a reliable favorite for everyday slicing, toasting, or pairing with your favorite spreads and soups.
Ingredients
-
2 cups all-purpose flour
-
1 cup rye flour
-
1 1/4 teaspoons salt
-
1/2 teaspoon instant yeast
-
1 1/3 cups lukewarm water
-
Optional: 1 tablespoon molasses or honey (for added flavor)
-
Optional: seeds (caraway, sunflower, or flax)
Instructions
-
In a large mixing bowl, stir together the all-purpose flour, rye flour, salt, and yeast.
-
Add the water and optional molasses or honey, stirring until a shaggy dough forms.
-
Cover the bowl with plastic wrap or a clean towel and let the dough rest at room temperature for 12 to 18 hours.
-
After the rise, turn the dough onto a well-floured surface. With floured hands, shape it gently into a round loaf.
-
Let it rest for 30 to 45 minutes on parchment paper while you preheat your oven to 450°F (230°C) with a Dutch oven inside.
-
Once preheated, carefully place the dough (with parchment) into the hot Dutch oven.
-
Cover and bake for 30 minutes. Then remove the lid and bake for another 10 to 15 minutes until the crust is deep golden brown.
-
Remove the bread from the Dutch oven and let it cool on a wire rack for at least 1 hour before slicing.
Notes
-
For added texture, roll the shaped dough in seeds before baking.
-
If you don’t have a Dutch oven, bake on a tray and place a water-filled pan in the oven for steam.
-
This bread pairs wonderfully with savory toppings like hummus, turkey bacon, or chicken ham.
-
Store in a paper bag for up to 3 days or freeze for longer storage.
- Prep Time: 10 minutes
- Cook Time: 45 minutes