
Oh, let me tell you about a bread recipe that completely changed how I feel about baking at home—my No Knead Rosemary Bread. This beauty is the definition of effortless and delicious. I remember stumbling across the idea of no-knead bread during a particularly busy week. I was craving something warm and homemade but didn’t want to wrestle with dough or spend hours kneading. That’s when this recipe stepped into my life like a warm hug.
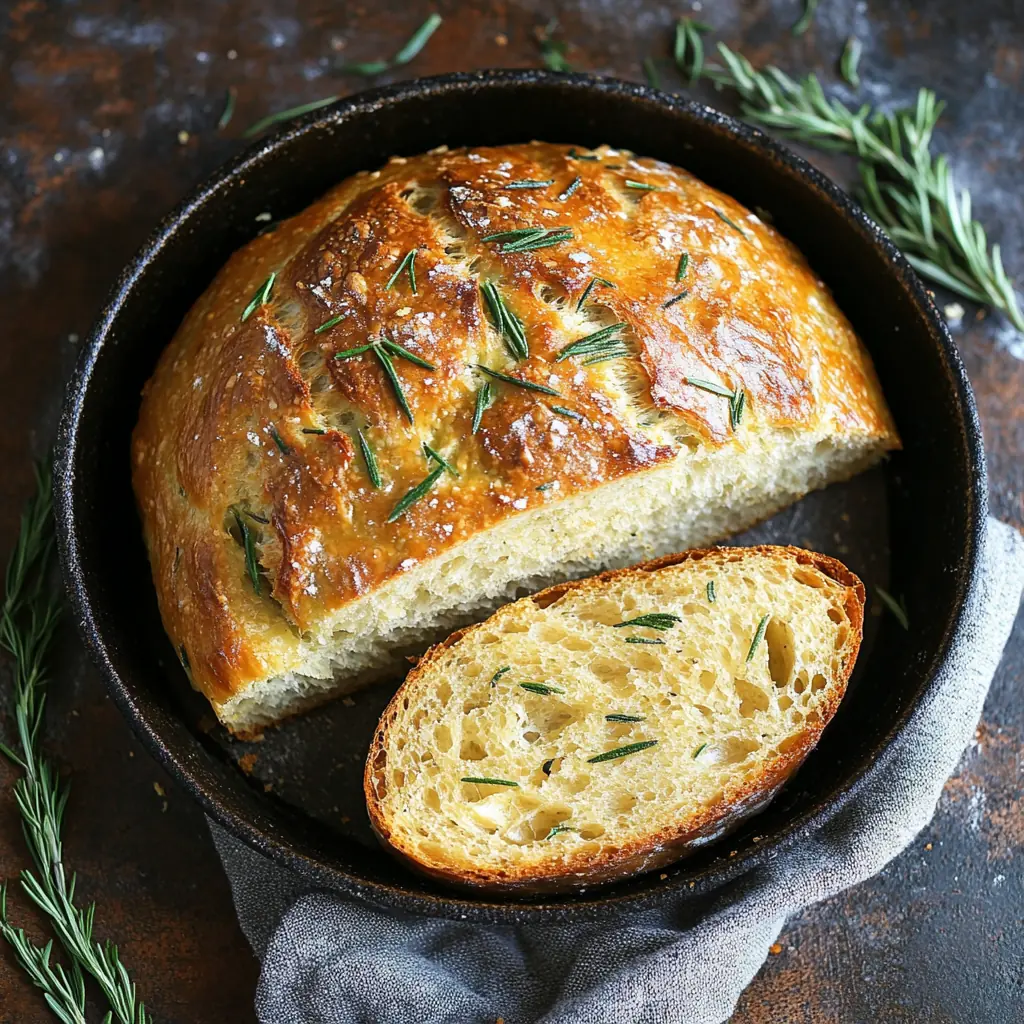
The very first time I baked it, I honestly didn’t expect much. But when I pulled that golden, crackly loaf out of the oven, the smell of rosemary filling my kitchen, I was hooked. The crust was crisp, the inside tender and chewy, and the rosemary gave it such a comforting, earthy flavor. My husband took one bite and just looked at me wide-eyed—like, “You made this?” Now it’s a go-to in our house, whether it’s a weekend breakfast, a side with soup, or the star of a bread-and-cheese platter.
What I love most is how little effort it takes. You don’t need a mixer. You don’t need fancy tools. Just a bowl, a spoon, and a bit of patience while the dough rests. It practically makes itself, and every time it comes out looking like it came from an artisan bakery. Plus, you can switch things up with your favorite herbs or add-ins. I’ve tried it with garlic, thyme, even olives—it never disappoints.
What’s in No Knead Rosemary Bread?
All-Purpose Flour: This is your base. Simple and sturdy, it gives the bread a soft interior and a nice bite.
Active Dry Yeast: Just a small amount works its magic over time, making the dough rise without any effort.
Salt: Essential for flavor, and it balances the earthiness of the rosemary.
Fresh Rosemary: This is the hero ingredient. I like to chop it finely and mix it right into the dough. You can also sprinkle a bit on top for that aromatic punch.
Warm Water: This brings the dough together. Make sure it’s not too hot, or it’ll kill the yeast.
Olive Oil (Optional): I sometimes brush the top with olive oil before baking to give it a little shine and added flavor.
Is No Knead Rosemary Bread Good for You?
Absolutely! It’s simple, clean, and made with ingredients you can recognize.
Flour: Provides essential carbohydrates for energy. You can even swap in some whole wheat flour if you want extra fiber.
Rosemary: Besides smelling amazing, rosemary is rich in antioxidants and has anti-inflammatory properties.
Low in Sugar and Fat: Unlike store-bought loaves, there are no unnecessary additives or preservatives here.
Yeast: It supports good digestion and contributes to that airy, beautiful texture.
Just keep your portion size in check, especially if you’re watching carbs, and this bread can be a wonderful part of your meal plan.
Ingredients
– 3 cups all-purpose flour
– 1/2 teaspoon active dry yeast
– 1 1/2 teaspoons salt
– 1 tablespoon fresh rosemary, finely chopped (plus extra for topping)
– 1 1/2 cups warm water
– Olive oil for brushing (optional)
Yields: 1 medium loaf (serves 4–6 people, depending on how generous your slices are!)
Let’s get ready to bring some bakery vibes to your kitchen with this beautiful loaf!
Ingredients
-
3 cups all-purpose flour
-
1/2 teaspoon active dry yeast
-
1 1/2 teaspoons salt
-
1 tablespoon fresh rosemary, finely chopped (plus extra for topping)
-
1 1/2 cups warm water
-
Olive oil for brushing (optional)
How to Make No Knead Rosemary Bread
-
Mix the Dry Ingredients
Start by grabbing a large mixing bowl. In it, combine the all-purpose flour, active dry yeast, and salt. Give it a quick stir to evenly distribute everything. Then, add the chopped rosemary and mix again. This step infuses your bread with that unmistakable herby aroma. -
Add the Water
Now pour in the warm water—make sure it’s not too hot, just warm to the touch. Stir the mixture using a wooden spoon or your hand until it forms a shaggy dough. Don’t worry if it looks messy or sticky; that’s exactly how it should be. This dough is not meant to be smooth or kneaded. -
Let It Rest
Cover the bowl with plastic wrap or a clean kitchen towel. Let it sit at room temperature for 12 to 18 hours. Yes, that long! This slow fermentation is where the magic happens. It helps develop the flavor and creates those beautiful bubbles inside the bread. -
Shape the Dough
Once the dough has risen and looks bubbly on the surface, flour your hands and gently shape it into a ball on a lightly floured surface. Try not to punch the air out too much—you want to keep those air pockets inside. -
Second Rise
Place the dough on a piece of parchment paper and cover it with a towel. Let it rest for another 30 to 45 minutes while your oven heats up. -
Preheat the Oven
While the dough is resting, preheat your oven to 450°F (230°C). If you’re using a Dutch oven (highly recommended), place it in the oven as it heats so it’s nice and hot when the dough goes in. -
Bake the Bread
Carefully remove the Dutch oven and transfer the dough—on the parchment paper—into it. If you like, brush the top lightly with olive oil and sprinkle on a few extra rosemary leaves for presentation. Cover with the lid and bake for 30 minutes. -
Uncover and Finish Baking
After 30 minutes, remove the lid and bake for another 10–15 minutes, or until the crust is beautifully golden and crisp. -
Cool Before Slicing
Remove the bread from the Dutch oven and let it cool on a wire rack. I know it’s tempting, but letting it cool helps the texture set properly.
Helpful Tips and Easy Variations
– Add Garlic: Want an extra punch of flavor? Mix in some minced garlic with the rosemary.
– Make it Cheesy: Fold in a handful of shredded cheese like mozzarella or cheddar for a savory twist.
– Swap the Herbs: No rosemary? Use thyme or oregano instead for a completely new flavor profile.
– No Dutch Oven? You can still bake it on a baking sheet—just place a pan of hot water on the bottom rack to mimic steam.
This bread is a favorite not just because of its taste but because of how beautifully easy it is to make. I hope you enjoy the simplicity and flavor as much as I do. Nothing beats the pride of pulling a homemade loaf out of the oven—especially one this good.
How to Make No Knead Rosemary Bread – Full Method with Extra Tips
Step-by-Step Guide
-
Mix Your Ingredients
Begin by combining 3 cups of all-purpose flour, 1/2 teaspoon of active dry yeast, and 1 1/2 teaspoons of salt in a large mixing bowl. Stir them together so that everything is evenly distributed. Then, mix in 1 tablespoon of finely chopped fresh rosemary for that signature earthy, aromatic flavor. -
Add Warm Water
Pour 1 1/2 cups of warm water into the bowl. The water should be warm but not hot—think of bathwater temperature. Use a wooden spoon or your hand to stir until the mixture forms a sticky, shaggy dough. It will look rough and unpolished, but that’s exactly what you want. -
Let the Dough Rest and Rise
Cover the bowl tightly with plastic wrap or a clean kitchen towel. Leave it out at room temperature for at least 12 hours, preferably up to 18 hours. This long, slow rise allows the yeast to work its magic, developing deep flavor and a chewy texture. By morning, you’ll see bubbles on the surface and the dough will look puffed up. -
Shape Without Kneading
Lightly flour your work surface and hands. Gently turn the dough out of the bowl. Don’t punch it down—just carefully fold it a few times and shape it into a rough ball. Then place the dough onto a sheet of parchment paper. Cover it with a towel and let it rest again for 30 to 45 minutes. During this time, preheat your oven to 450°F (230°C) with your Dutch oven inside it. -
Bake in a Dutch Oven
Once your oven is hot and your dough has rested, carefully remove the Dutch oven. Lift the dough using the parchment paper and place both directly into the Dutch oven. Optionally, brush the top of the dough with a little olive oil and sprinkle some extra rosemary for a rustic look. -
Cover and Bake
Put the lid on the Dutch oven and place it back in the oven. Bake for 30 minutes covered. This steam-filled environment helps create that incredible artisan-style crust. -
Uncover and Crisp
After 30 minutes, take off the lid and continue baking for 10 to 15 minutes. You’ll notice the top turning a beautiful golden brown. The crust should be crisp and firm when tapped. -
Cool Completely Before Slicing
Once baked, remove the bread from the Dutch oven and let it cool on a wire rack for at least 30 minutes. This is a crucial step—cooling helps finish the baking process and sets the crumb inside.
Fun Twists to Try
– Rosemary Garlic Upgrade: Mince a couple of garlic cloves and mix them into the dough along with the rosemary. It’s subtle but adds a savory warmth.
– Olive Infusion: Fold in some chopped black or green olives for a Mediterranean flair. Their salty bite complements the rosemary beautifully.
– Cheesy Crust: Sprinkle shredded mozzarella or Parmesan on the top of the dough right before baking for a bubbly, golden topping.
– Rustic Flour Dusting: For a bakery-style appearance, dust the top of the dough with a little flour before baking.
– No Dutch Oven Method: If you don’t have a Dutch oven, place a cast iron skillet or heavy pan on the bottom oven rack and fill it with boiling water to create steam. Then bake the bread on a preheated baking stone or regular tray on the middle rack.
A Few Extra Tips
– Use Fresh Rosemary: Dried rosemary will work in a pinch, but fresh rosemary gives a more vibrant, piney flavor and softer texture in the bread.
– Plan Ahead: This bread needs time, so it’s perfect for prepping the night before. In the morning, all that’s left is shaping and baking.
– Storage: Once cooled, wrap the bread in a clean towel or place in a paper bag. It’s best enjoyed within two days, but you can also slice and freeze it for longer storage.
Every time I make this bread, it fills the kitchen with the most comforting aroma. It’s the kind of loaf that feels fancy but is secretly one of the easiest recipes I know. Perfect alongside soups, salads, or just a slather of butter. Let me know how it turns out in your kitchen—I always love seeing the golden crusts and hearing your baking wins!
Frequently Asked Questions About No Knead Rosemary Bread
1. Can I use dried rosemary instead of fresh rosemary?
Yes, you absolutely can. However, fresh rosemary provides a more vibrant flavor and softer herb texture in the baked bread. If you’re using dried rosemary, reduce the quantity slightly—use about 1 to 1½ teaspoons instead of 1 tablespoon. Also, consider crushing it lightly in your hand before adding it to release its aroma more fully.
2. What if I don’t have a Dutch oven?
No worries! While a Dutch oven helps create the ideal crust thanks to its heat retention and steam-trapping abilities, you can still bake the bread without one. Preheat a heavy baking tray or pizza stone, and place a pan of boiling water on the bottom oven rack to simulate steam. Carefully slide the parchment paper with the dough onto the hot tray or stone, and bake as directed. You may not get the exact same crust, but the results will still be delicious.
3. Can I let the dough rise in the refrigerator instead of at room temperature?
Definitely. Refrigerating the dough during the first rise will actually deepen the flavor even more. Simply cover the dough and let it sit in the fridge for up to 24 hours. When you’re ready to bake, allow the dough to come to room temperature for about 1 to 2 hours before shaping and continuing with the rest of the steps.
4. Why is my bread too dense or flat after baking?
There could be a few reasons. One common issue is not allowing the dough enough time to rise or using water that’s too hot, which can kill the yeast. Also, over-handling the dough after the first rise can deflate the air pockets that give it that lovely open crumb. Make sure your yeast is active, follow the long fermentation process, and handle the dough gently when shaping. These steps will help create a light and airy loaf with a crisp crust.

No Knead Rosemary Bread
- Total Time: 50–55 minutes
- Yield: 1 loaf (serves 6–8) 1x
Description
This No Knead Rosemary Bread is a rustic and aromatic loaf that’s surprisingly simple to make. With its crispy crust, soft interior, and fragrant rosemary throughout, it’s the perfect bread for any meal. Whether you’re pairing it with soup, serving it alongside dinner, or enjoying it with a drizzle of olive oil, this recipe is a must-try for both beginner and seasoned bakers.
Ingredients
-
3 cups all-purpose flour
-
1½ teaspoons salt
-
½ teaspoon instant yeast
-
1 tablespoon fresh rosemary, chopped (or 1 to 1½ teaspoons dried)
-
1½ cups warm water (not hot)
-
Extra flour for dusting
-
Olive oil (optional, for brushing)
-
Additional rosemary or coarse salt for topping (optional)
Instructions
-
In a large bowl, mix flour, salt, yeast, and rosemary.
-
Add warm water and stir until a shaggy dough forms.
-
Cover the bowl with plastic wrap or a clean towel. Let it rest at room temperature for 12–18 hours.
-
After the first rise, the dough should be bubbly and doubled in size.
-
Lightly flour a surface and your hands. Gently turn out the dough and shape it into a round loaf without over-kneading.
-
Place the dough on a piece of parchment paper. Cover loosely with a towel and let it rest for 30–45 minutes.
-
Meanwhile, preheat your oven to 450°F (230°C) with a Dutch oven inside.
-
Once preheated, carefully place the dough (with parchment paper) into the Dutch oven.
-
Cover and bake for 30 minutes. Then remove the lid and bake for another 10–15 minutes, or until golden and crusty.
-
Remove from oven and let cool on a wire rack before slicing.
-
Brush with olive oil and sprinkle extra rosemary or salt if desired.
Notes
-
Make sure the water is warm, not hot, to avoid killing the yeast.
-
You can store leftover bread in a paper bag at room temperature for up to 2 days. Reheat in the oven to restore crispness.
-
This dough is very sticky—don’t add extra flour during mixing, only when shaping.
-
For added depth of flavor, you can refrigerate the dough overnight during the first rise.
- Prep Time: 10 minutes
- Cook Time: 40–45 minutes